Last week I posted a launch video made entirely with Claude Opus 5.5, to introduce a new product, Box, and it went viral; Viral by our definition because for a totally new account on X, that video did over 60k views, and got us over 150 signups from all over the world in less than 2 days.
For context, Box is an all-in-one platform for running your business online, in person, or in the DMs. Your customers get a site where they can buy whatever it is you sell, whether that’s physical goods, digital products or tickets, or book appointments and reservations. You get a dashboard to manage everything: customers, staff, inventory, orders, bookings, locations, and more.
With Box, business owners no longer have to:
- Spend hours on manual reconciliation. Every payment, from every channel, is recorded against its order and source, so the books match without you doing it by hand.
- Chase payment screenshots. Customers pay through your checkout or a payment link, so you see the payment confirmed instead of waiting for proof.
- Copy orders between apps. Orders from your website, your DMs and in person all land in the same place.
- Fight with messy spreadsheets. Your sales, best sellers and profit and loss are already worked out for you.
And here’s the video:
The Box launch video
— Linda Ikechukwu (@_MsLinda) October 6, 2026
When we posted the announcement, there were the congratulatory messages and the “oh, this is cool” comments. Then I revealed that the video was actually created by me, in one day, using Claude. And the comments changed.
People started asking, “What’s the prompt for this?” And others came into my DMs asking me to offer it as a service for their own products or teach them how to do it, because it doesn’t look or feel like AI slop.
So I’m writing this for the solo founder launching a product, or the small team about to ship something, who can’t spend the $3,130 it costs on average to commission a 60-second motion design video (according to Advids).
In this day and age, if you want to build a brand with a real consumer fan base, or just do well on socials, you need video as part of your strategy. If a picture is worth a thousand words, a video is worth a million.
63% of consumers say they’d rather watch a short video to learn about a product than read an article, according to SocialPilot’s 2026 video marketing statistics.
And this isn’t just for SaaS products. Businesses that sell physical products can do something similar:
Another banger!
— Achalugo (@_MsLinda) October 10, 2026
Voiceover was created through @higgsfield claude MCP connector. https://t.co/Tr5xqJshkv
So, what you need to make a motion design video with Claude that doesn’t look like AI slop?
Three things you need to make a motion design video with Claude that doesn’t look like AI slop
First, there’s no one big prompt. If you came here looking for a prompt to copy and paste, I’m sorry to disappoint.
The prompt contributes only about 10% of what it takes to create a motion design video with Claude that doesn’t look like AI slop. You need to lock in three things first:
A story
A story is what connects everything. If you want people to care, you have to tell them a story, because facts tell but stories sell. A feature list tells people what your product does. A story makes them see themselves in it.
So before you open Claude, get very clear on what you’re trying to communicate.
What should this video be about? Who is it for? What do you want the people who watch the video to leave knowing?
If you give AI just anything, it will give you just anything. AI will not manufacture taste.
I spent the night looking at a lot of other launch and announcement videos, asking myself what the thing I wanted to say here was. What did I want people to leave knowing?
The more I absorbed, the more I started observing a pattern. The best launch scripts have four things:
- A hook. For me, the hook was that I wanted the people Box was built for to see themselves first, to stop and be like, “Oh wait, that’s me.” The best hook combines words and a visual, so the video starts with a light switch coming on, because nothing grabs attention quite like it, followed by the text, “Your business has never been one thing.” Now the viewer is wondering what that means, and then I show you a business you can identify with: the salon that sells haircare products, the padel club, the creator.
- The pain. What doing things the same way is costing, and why things can’t continue like that.
- The solution. The feature that eliminates that pain, and what things look like once that pain is gone.
- A CTA. What you want people to do next.
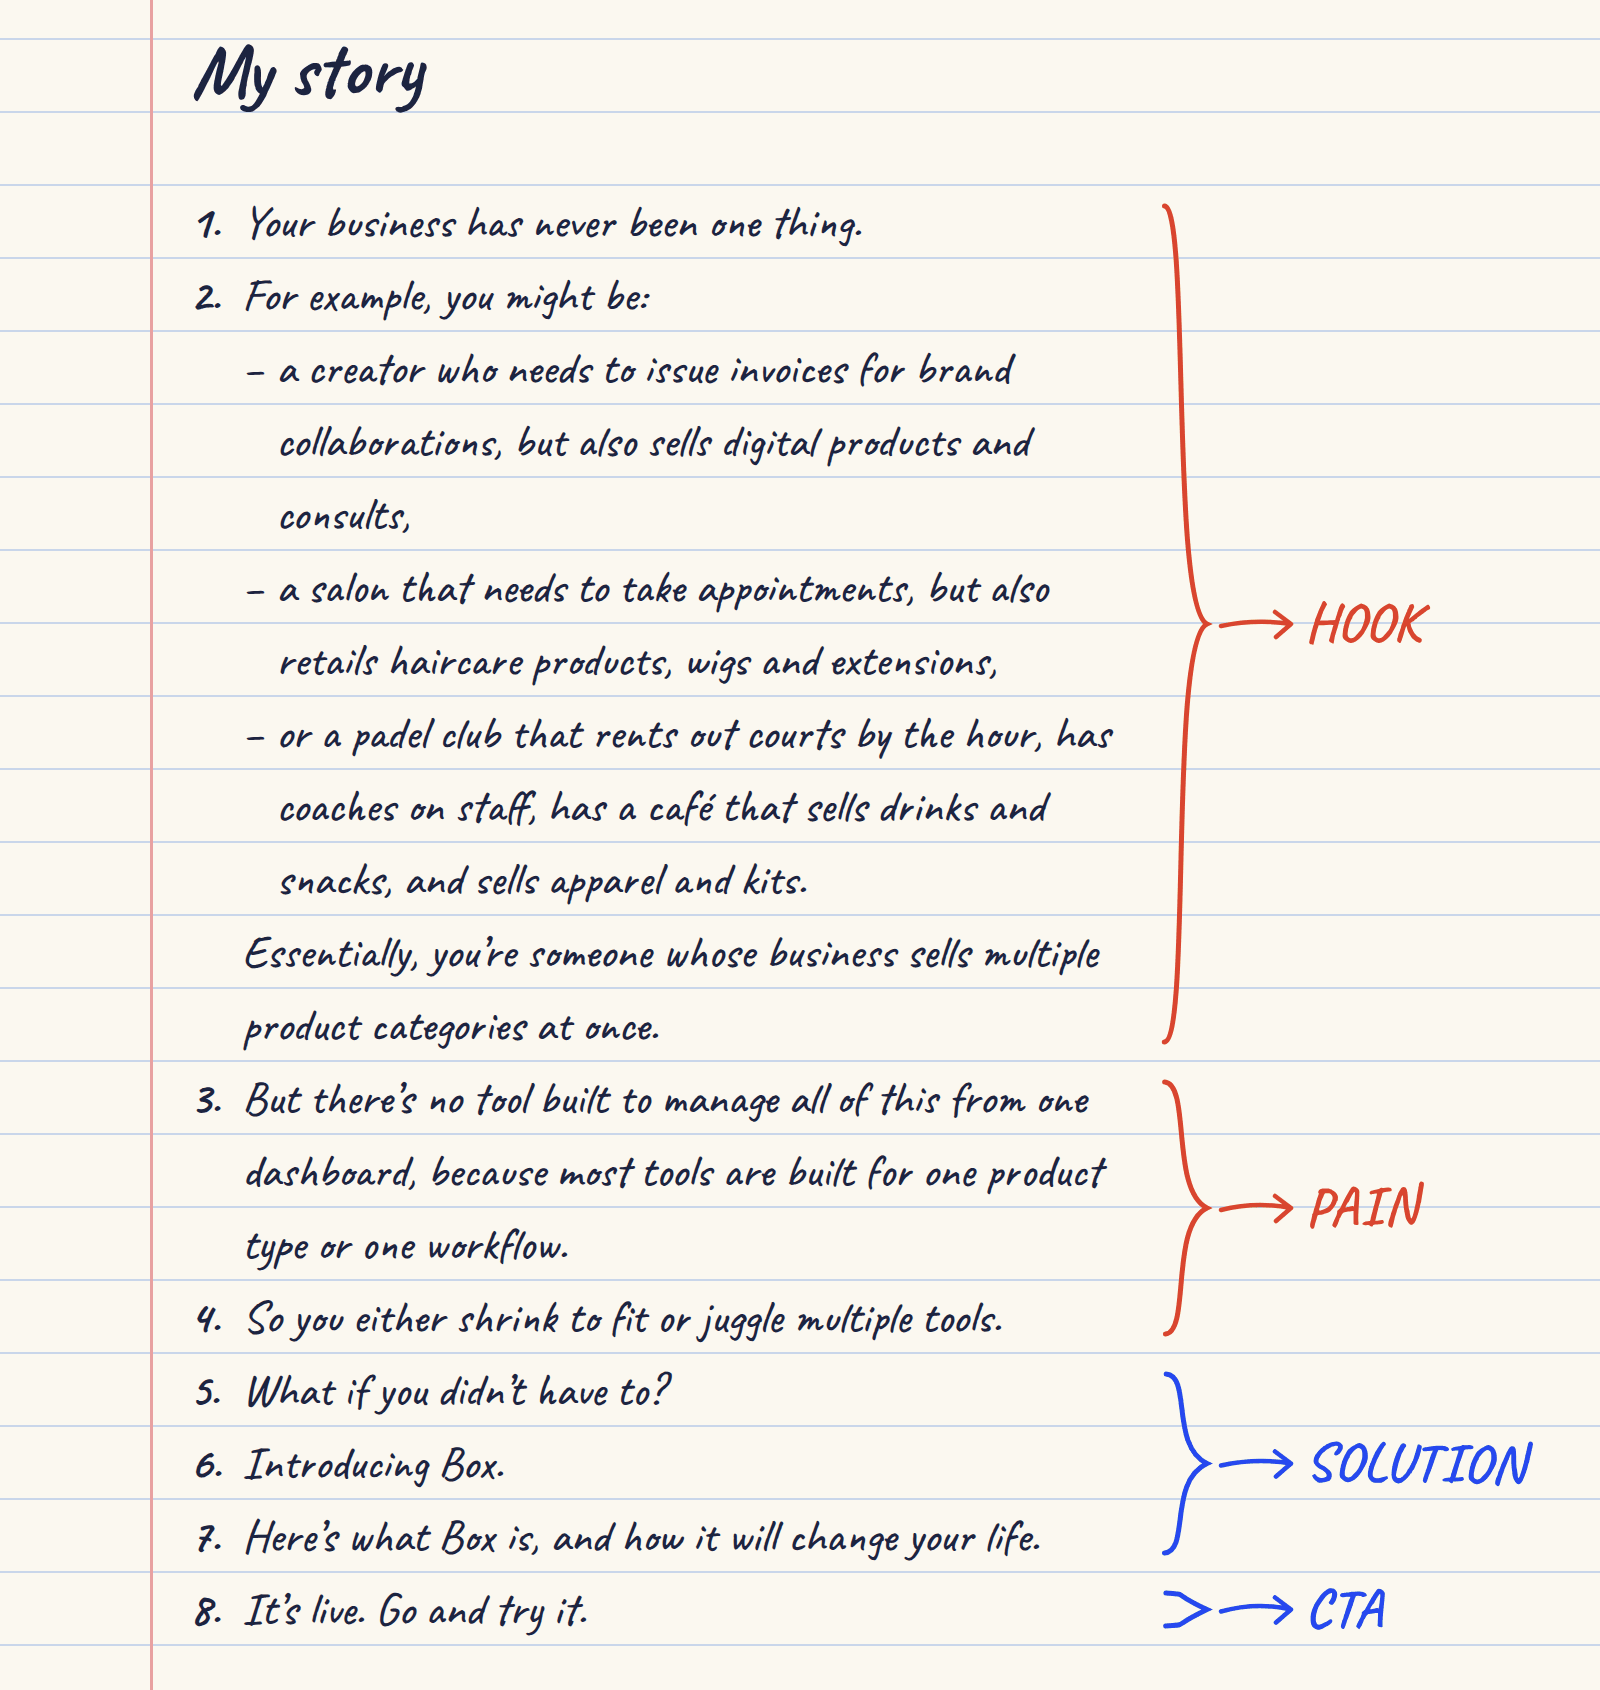
Every launch script I studied had these four parts. What changes is the angle you tell them from, and the angle you pick shapes how each part plays out.
The most common angles are:
- Problem to solution. The hook shows the problem, the pain is what it costs, the solution is your product, and the CTA invites people to try it. This is what I did with Box. “Your business has never been one thing” opens on the problem before Box ever appears.
- Before and after. The hook is the “before”, the pain is everyday life without your product, the solution is the “after”, and the CTA asks people to make the switch.
- What if. The hook is a question your audience hasn’t dared to ask, the pain is why they never asked it, the solution answers it, and the CTA lets them see it for themselves.
- A day in the life. The hook is one moment in a customer’s day, the pain shows up as the day goes on, the solution is where the product steps in, and the CTA is “make your day look like this”.
- A fast feature tour. The hook is your boldest feature, the pain is barely mentioned because the audience already knows it, the solution is the tour itself, and the CTA is to try it.
- A teaser. The hook builds curiosity, the pain is hinted at, the solution is held back, and the CTA is to join the waitlist or watch for the launch.
You don’t have to pick only one. The Box video is mostly problem to solution, with a “what if” turn in the middle.
The good news is that Claude can help you figure out your story.
Here’s a modified version of a prompt from the skill I’ve written for the Box team, so we can turn out videos like this on demand:
I’m making a short motion design video for [product or feature]. It’s a [launch / update / ad] for [platform], about [length] long. Here’s my rough brief: [paste or dictate whatever you have, even if it’s messy]. Here’s where you can read more about it: [website, docs, deck].
I don’t have the story figured out yet, so help me get there in steps. Don’t move to the next step until I reply.
Step 1. Understand it. Read what I’ve shared. Then ask me one question at a time until you understand what the product does, who it’s for, what they use today instead, what that costs them, and what I want people to leave knowing. When you have enough, play it back to me in a few sentences so I can correct you.
Step 2. Find the core of the story. Write the pain, the solution and the CTA in one or two lines each, in my own words. Don’t add features or claims I didn’t give you. If you found something in your research that would help the story land, like a feature, a number or a customer problem I didn’t mention, list it separately and ask me to confirm it before you use it.
Step 3. Pick an angle. Suggest the three angles, or combinations of angles, that best fit this story. For example, problem to solution, before and after, what if, a day in the life, a fast feature tour, a teaser, or a mix like what if plus problem to solution. For each one, give me three hook options that would make [audience] stop and see themselves in the first three seconds, and pair each hook with a visual. Tell me which you’d pick and why. If I want to mix parts of different options, go with it.
Step 4. Write the story. Using the angle (or mix of angles) and the hook I choose, write the full story as a numbered list of short lines, one idea per line, in the order they’d appear on screen. Mark which lines are the hook, the pain, the solution and the CTA.
A scene-by-scene storyboard
Once you have your story, the next thing to decide is how to visually communicate, that story.
What should people actually see on screen at every point in the video: a line of text, a product screen, a piece of footage, a logo.
Most product launch and feature update videos don’t have a voiceover, so the visuals have to portray the whole message. Go through your story line by line and ask, for this part of the story, what should people be looking at?
This is where studying a lot of examples pays off, because it gives you ideas.
For the Box video, I knew I didn’t want the intro to be just motion graphics. I wanted photorealistic B-roll in the background:
- a creator recording content,
- a hairdresser at work,
- a padel court, all with the text sitting on top of the individual footages.
I’ll show you how I created that footage later.
For each thing you put on screen, you also need to decide how long it stays there. The golden rule is that each clip shouldn’t be so fast that it doesn’t register, or so slow that people lose interest. It has to give people enough time to read while still holding their attention.
Here are some rules I use to set the pace and timing for my videos:
- Match the timing to what’s on screen. According to the BBC’s subtitle guidelines, people read at about 160 to 180 words a minute, which is about a third of a second per word. So if five words are going to appear in a scene, it needs around two seconds. If six elements are going to show up on screen, you need about three to four seconds.
- Use pattern interrupts. We live in a world of short attention spans. A pattern interrupt breaks what the viewer has gotten used to, so their attention snaps back. In practice, change something on screen every two to four seconds: introduce a new line, a new image, a new element or a new background colour. But don’t space the changes evenly, because a steady rhythm becomes a pattern of its own and gets boring. So mix up the length of each scene: one second here, four seconds there, then two, then three.
- Keep the whole video under a minute. For launch, update and ad videos, 30 seconds to a minute is the sweet spot: long enough to tell the story, short enough that people stay to the end. The exception is a proper feature or product walkthrough, which can run longer. If your video runs over a minute, it’s usually because some scenes are trying to say too much, or some scenes aren’t needed at all. Cut those, and you’ll find you can still tell the whole story in under a minute. The Box video is 43 seconds.
While you plan what people will see in each scene, think about what they’ll hear too. Note the sound effect that should go with each scene, or ask Claude to suggest them.
Here’s what the storyboard for the Box video looked like:
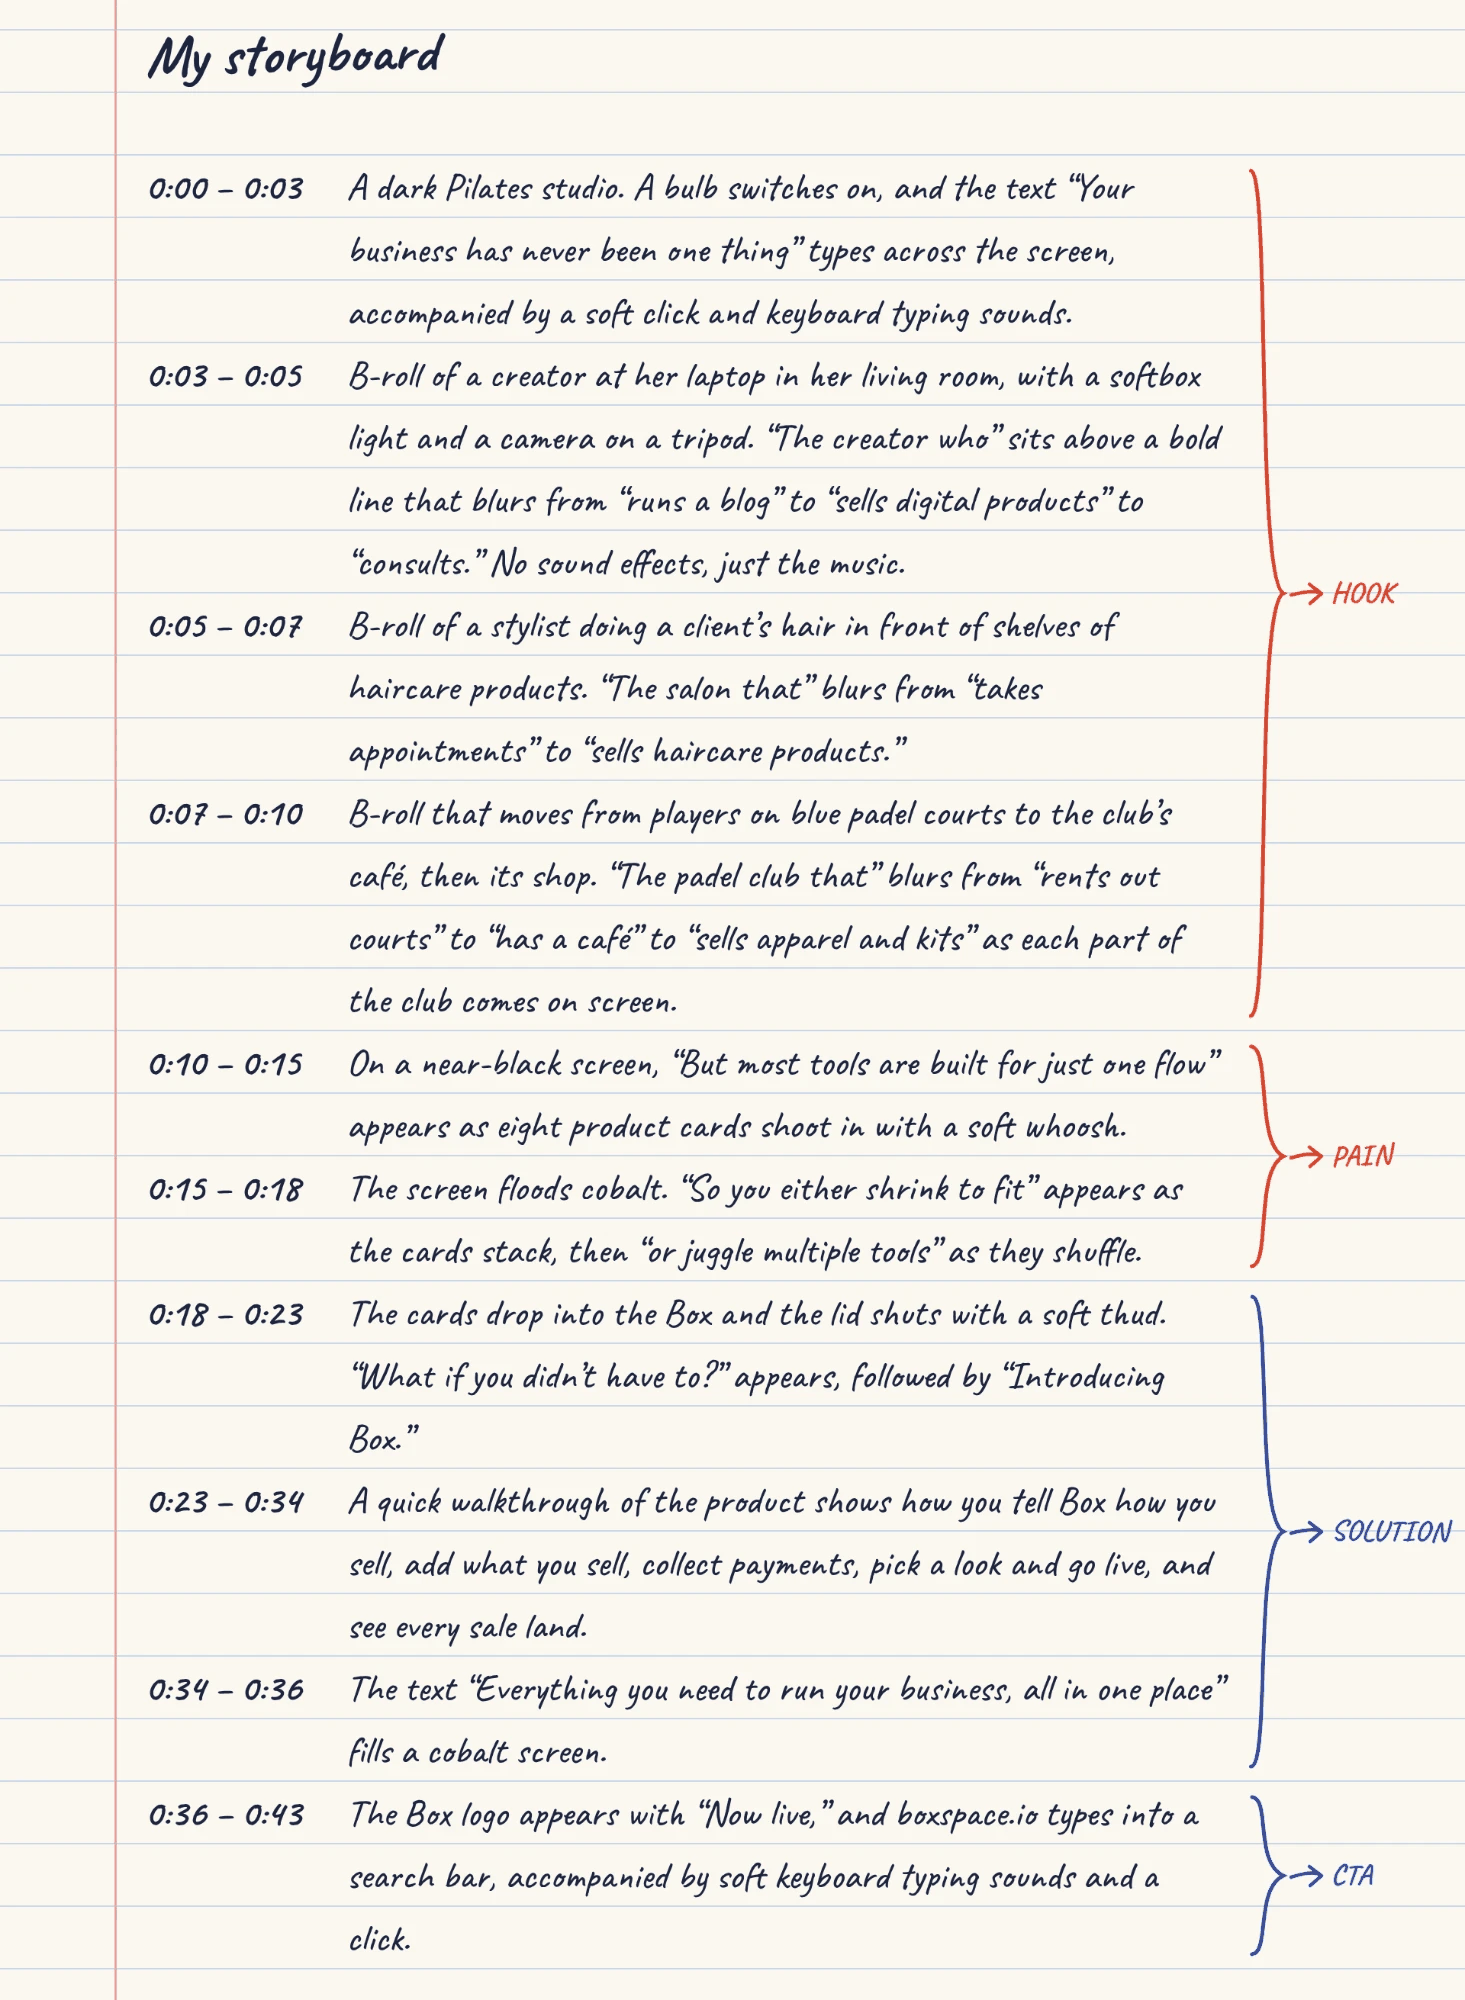
And as usual, Claude can help you figure out your scene-by-scene storyboard, or at least give you ideas. Here’s another modified version of a prompt that’s part of the skill I’ve written for our team to produce videos faster:
Using the story we just agreed on, plan what should appear on screen, scene by scene.
Keep the video between 30 seconds and a minute, whatever it takes to communicate the idea properly from start to finish within that time. There’s no voiceover, so everything has to be communicated through background footage, on-screen text or visuals.
For each part of the story, suggest:
- what should show up on screen to communicate that idea
- the exact words that appear
- how long you think it should stay up (about a third of a second per word, so five words need around two seconds)
- the sound effect that should go with it
Change something on screen every three to four seconds, and vary the length of each scene so the pace doesn’t feel monotonous. Don’t describe how anything moves yet, only what’s on screen.
At the end, add up the total. If it runs over a minute, tell me which scenes I could cut and still tell the story.
If you want a voiceover, remove the line about no voiceover and ask Claude to suggest one for each scene instead.
Assets
Now that you know what each scene will show, you need the assets to build it. Without them, Claude fills the gaps with whatever colours and fonts it likes, and that lack of brand integration is what makes so many AI videos look the same.
You’ll usually need:
- Brand assets: your logo, colours and fonts.
- Product visuals: static screens or a walkthrough of a process in the product, depending on your storyboard.
- Footage: any B-roll clips you want to use.
- Motion references: examples of the animation style you want.
- Sound effects and music.
If your designs live in Figma, connect Figma’s official MCP server to Claude (you’ll need a full or Dev seat), paste the link to a frame, and Claude reads the colours, fonts and screens directly. If you don’t use Figma, upload your logo as an SVG and everything else as high-resolution PNGs or JPEGs.
For a feature walkthrough, you can give Claude the login for a test account and tell it which flow to show. It can go through the product and record it itself.
If you already have footage you want to use, add it now. If you need to create it, we’ll get to that later.
With what goes on screen sorted, the next thing to give Claude is a sense of how it should move. That’s what motion references are for, and they’re how you teach Claude your definition of good. Share videos whose style you like and ask Claude to break down how they were made.
For the Box video, I shared a few product launch videos and UI animation reels I liked on Instagram, and Claude also learned from motion libraries like React Bits and Magic UI, and from Apple’s and Google’s motion guidelines.
Other good places to point it to for motion graphic video templates are GSAP, AutoAE, Raylight, Animos, Prompt Motion and Jitter. The goal is for Claude to learn the techniques and recreate them in your brand, not copy someone else’s work. If you do borrow something directly, give credit.
For sound, ask Claude to fetch sound effects and music from libraries like Freesound, Mixkit and Openverse. If you have your own tracks you want to use and have the usage rights to, upload them to Claude as MP3 files once the video is built and ask Claude to add them.
If you’ll make videos for the same brand often, ask Claude to save all of this as an asset library, so you don’t have to gather it again.
And here is a follow-up prompt from the skill I built for our team. It picks up where the storyboard prompt left off:
Now that we have the scene-by-scene storyboard, let’s build the assets we need for this video.
- Brand: here’s our Figma file [link]. Pull the logo, colours and fonts, and tell me if anything is missing.
- Product visuals: list every scene that shows the product. Pull static screens from Figma. For walkthroughs, here’s a test login [details]: go through the flow and record it. If you’re not sure how a flow should be shown, ask me.
- Footage: here’s the footage I already have [files]. Match each clip to its scene, and list any scenes that still need footage.
- Motion: here are a few videos whose style I like [links]. Study them, look for more on sites like GSAP and Prompt Motion, and build a library of reusable motions in our brand. Suggest which motions fit each scene, and render a preview reel for me to approve.
- Sound: fetch sound effects and music that fit the storyboard from Freesound, Mixkit or Openverse, and suggest what to use for each moment. If I have my own music, I’ll upload it once the video is built.
Save everything as one asset library for [brand], so we can reuse it next time.
Building your product launch video with Claude, one scene at a time
Now that Claude has the scene-by-scene storyboard and the assets it needs for each scene, ask it to start building the scenes.
It’s usually better to have Claude build one scene at a time instead of the whole video at once. That way, you catch mistakes and correct them immediately, like a sound that isn’t right, before they carry into the next scene. Each new scene then builds on the ones you’ve already approved.
Behind the scenes, Claude builds the video as code. It uses Remotion, a library that turns React code into video, and FFmpeg, a tool for converting and combining video and audio files, to add the sound and export the final file. You don’t need to know how either works, but name them in your prompt so Claude uses them from the start.
For the Box video, as I mentioned earlier, I knew I wanted photorealistic B-roll to open the video. But here’s the thing, Claude is terrible with photorealistic footage, while Google Flow does a spectacular job.
So for every scene where I needed footage, I asked Claude to write me a prompt for Flow.
Generating photorealistic B-roll with AI
You should know, though, that Flow has its limits. It’s good with imagery, photorealistic footage and voice. If you want someone speaking in the footage, Flow can handle that. But once you ask it to superimpose text onto a clip, the spelling almost always comes out wrong.
For my video, Flow created the background footage, and Claude put the text on top. And unfortunately, Flow doesn’t have a connector or skill for Claude, so I had to copy each prompt from Claude and paste it into Flow myself.
If you’d rather stay inside Claude, you can consider other video generation models:
- Seedance. ByteDance’s video model. You can use it through Higgsfield, a platform that gives you several video models (including Seedance, Kling and Veo) under one subscription. Higgsfield has a connector for Claude, so you can generate footage without leaving the chat.
- Kling. Makes realistic footage and is especially good with camera moves like tracking shots.
- Runway. Makes cinematic footage from a text prompt or a still image.
All of these tools charge in credits, and you get credits through a subscription.
Google Flow comes with Google’s AI plans (Plus, Pro or Ultra), which are part of Google One. Plus gives you 200 Flow credits a month, Pro gives you 1,000 for $19.99 a month, and Ultra gives you 10,000 or 25,000 depending on the tier. If you don’t pay for any of them, you still get 50 free Flow credits a day.
Higgsfield, where you can use Seedance and Kling, doesn’t really have a free plan for video. Its cheapest plan is $19 a month for 270 credits, but it only includes the lighter versions of Seedance. To use every model, you need the Plus plan, which is $59 a month (or $47 a month if you pay yearly) for 1,200 credits.
Runway isn’t on Higgsfield, so you’d pay for it separately.
Every model counts credits differently, so to compare them, I’ve worked out what one 8-second clip costs on the top models from each company:
| Model | Best for | Where you get it | Plan | Credits for an 8-second clip | Rough cost per clip |
|---|---|---|---|---|---|
| Veo 3.1 Fast | Background footage that sits behind text, and testing ideas cheaply. | Google Flow | Free: 50 credits a day. Google AI Pro: $19.99 a month for 1,000 credits | 20, at 720p | About $0.40, or two free clips a day |
| Veo 3.1 Quality | Close-up shots, like hands or a product, and the one shot people will really look at. | Google Flow | Same as above | 100, at 720p | About $2 |
| Gemini Omni Flash | Recreating an exact person or product from reference images and keeping them consistent across shots. | Google Flow | Same as above | 25, at 720p | About $0.50 |
| Seedance 2.0 | Longer continuous shots, up to 15 seconds. | Directly on Dreamina, ByteDance’s app, or through Higgsfield, which connects to Claude | Dreamina: about 225 free credits a day, paid plans from about $15 a month. Higgsfield: Plus plan, $59 a month for 1,200 credits | About 36 on Higgsfield, at 720p | About $1.30 on Dreamina, $1.75 on Higgsfield |
| Kling 3.0 | Shots where the camera movement matters, like following someone through a shop. | Directly on Kling’s app, or through Higgsfield, which connects to Claude | Kling: 66 free credits a day, paid plans from $6.99 a month for 660 credits. Higgsfield: Plus plan, $59 a month for 1,200 credits | About 20 on Higgsfield, at 1080p | About $1 on Higgsfield |
| Runway Gen-4.5 | Turning a still image, like a product photo, into a moving shot, without leaving Claude. | Directly on Runway, which has its own Claude connector | Standard: $12 a month (billed yearly) for 625 credits | 96 (12 per second) | About $1.85 |
What one 8-second clip costs on the top model from each company. Scroll sideways to see every column.
Once you have your footage, you’re ready to build. Here’s the build prompt from the skill. This is also where you tell Claude what format you want the video in:
Using the storyboard and the asset library, build the video with Remotion, and use FFmpeg to add the sound and export it. If you need any other tool, library or asset to make this video as good as it can be, install it, build it or pull it in yourself, and tell me what you added.
- Format: [16:9 for X and YouTube, 1:1 or 4:5 for LinkedIn and Instagram feeds, 9:16 for Reels and TikTok], 1080p, 30fps, MP4.
- Footage: here’s the B-roll for [scenes] [files]. Use it as the background and put the text on top.
- Motion: [for scene X, use this reference]. For every other scene, choose from the motion library, and don’t give any two scenes the same text or background motion.
- Sound: add sound effects only to the most important moments, not every element. Keep them soft and muted. Use real sound files from the asset library, not sounds you generate yourself.
- Screens and images: if any asset is low resolution, convert it to high resolution before using it.
Use only what’s in the asset library and the footage, with our exact colours and fonts, and don’t make up details. Never leave the screen empty while waiting for the next element.
Build one scene at a time. For each scene, show me a still first, then animate it once I approve and render a preview with its sound. Once I approve that, build the next scene and connect it to the one before, so the transition plays smoothly. Keep going until the whole video is done, then render the final file.
What makes an AI-made video stand out
Making videos that stand out with AI is really about creativity and being a great communicator.
Claude can write the code, pull in the assets and render the video, but deciding what the video should make people understand and feel is all a matter of taste. Once you figure out what you want people to take away from your video, you’ve done 90% of the job.
So if there’s one thing you should focus on getting better at right now, it’s taste. And the way to build it is the same way I did for this video: study the work of people who have it.